I am excited to discuss the craziest thing I attempted last year — squeezing a King Size Bed into what is best described as a Shoe Box Bedroom. Ridiculous? Yes! Listen to why; while it seemed absurdly crazy, it worked and I could never again go to sleep in anything less than a King.
Liam’s back was literally broken due to his heavy lifting at the Depot. This caused him to toss and turn on our old double bed and take me (at seven months pregnant) with him every time he turned. It had to happen – the old bed was out. However, we have an extremely small bedroom in the Dunstable House (approximately 10 x 11 ft. or roughly 3m2), certainly no place for a King size bed!
Everyone thought I was mad. Mum visited, looked at the space and simply shook her head. “Aisha, you cannot squeeze that enormous bed into this tiny space — where will you put everything else?” She wasn’t wrong — Mum does know what she is talking about. However, I had done the math — a typical King Bed measures 76” wide x 80” long. While it would technically fit in our small bedroom with some room to breathe, the question remained whether we would actually be able to live with it.
What I learned quickly is that while something may fit into a space, it doesn’t mean it is livable. You need sufficient space to walk around a bed or you’ll find yourself performing this bizarre type of crab walk every time you want to dress or open a window. According to someone I read, you should have at least 24” of clearance around a bed. To be honest, in a small room you have to think outside of the box about how that space can be utilized.
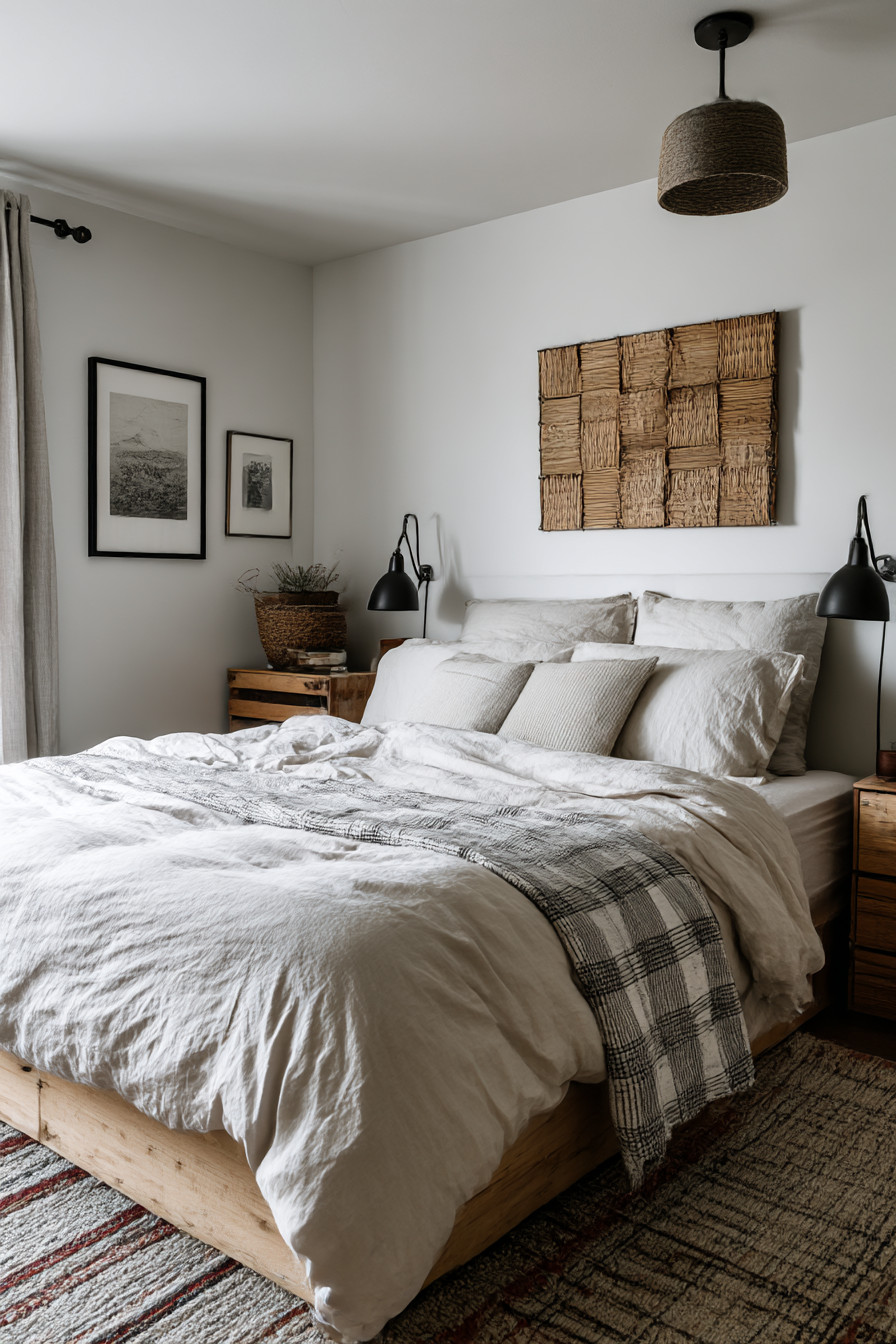
Instead of placing the bed in the middle of the room as you often see in all those perfect pictures of bedrooms, we placed it directly against one wall. Since our bedroom has a beautiful window that receives fantastic morning sunlight, the bed is positioned against the wall opposite the window. By doing this, we created approximately 36” of usable space for walking near the window wall and approximately 12” of usable space next to the wall. That narrow space is great for charging our phones and nothing else — which is exactly all we require.
However, it was almost a deal-breaker when it came to selecting the headboard for our new King bed. Liam fell in love with this large padded headboard he saw online. It looked incredible however it would’ve consumed yet another six inches of precious space we did not have. Remembered this boutique hotel in Brighton where they’d mounted a very thin headboard straight to the wall and therefore allowed the bed to sit flush against it. Saw a beautiful rattan one at West Elm for $240 that mounts flat. Well worth the money since it appears high-end but does not eat up any floor space.
Storage became crucial when implementing this layout. The platform bed we selected has four deep drawers underneath — amazing for storing all of Amara’s out-grown clothing and all of our Winter bedding. We were forced to remove both of our previous bedside tables entirely since they were causing our room to resemble a furniture store rather than providing adequate space. Replaced them with two floating shelves from IKEA — cost approximately $20 each and provide ample storage for all of the items we require without obstructing the floor space.
Was surprised by how difficult lighting was to accomplish. Clearly we could not use table lamps without having bedside tables. Our ceiling light was one of those harsh overhead types that made our entire room appear as though we were sitting in a waiting room. Located these wall-mountable reading lights at John Lewis — brass ones that swivel and dim. These are located right above where our heads are when we’re lying down and allow us to read without disturbing each other.
Nearly drove myself crazy thinking about rugs. Initially my intention was to purchase a small rug that would tuck neatly under our bed — however when I lay it out it appeared choppy and confined the space. Ultimately ended up purchasing a substantially larger rug (8’ x 10’) that extends past our bed on three sides. Although seemingly counter-intuitive in a small space, by extending across multiple areas of the floor creates a single plane instead of separate islands of furniture and thus gives the illusion of more space.
We also had to drastically alter our storage options. We inherited a beautiful however large wardrobe from Liam’s grandmother — beautiful item however it consumed virtually a quarter of our room. Reluctantly sold it and installed a custom-built-in wardrobe system along one wall. Approximately $800 for the IKEA unit plus labor costs for installation; however provided us with double the storage space in half the foot print.
Mirrors everywhere… obviously. Mirrors are known to create an appearance of larger spaces however placement is key. A large mirror is placed on the wall opposite our window allowing the natural light coming through the window to reflect back into the room. Additionally placed a smaller mirror on the back of our bedroom door — sounds illogical; however when our door is open it provides an illusion of depth that prevents the room from appearing boxed in.
In terms of colors; had to make sure they were working extremely hard in this configuration. Desperately wanted to paint our walls dark/moody like many I see on Instagram; however in a space this tight it would’ve been akin to sleeping in a cave. Painted our walls a warm white color and brought drama via bedding. Purchased a gorgeous forest green linen duvet from The White Company and purchased velvet throw pillows in navy blue and deep red. Appears cozy and sophisticated however not overwhelming.
Something no-one warns you about — attempting to make a King bed accessible from only one side is similar to participating in an extreme sport. Eventually find yourself executing this ridiculously awkward reach-and-stretch motion attempting to tuck in the furthest corner of your bed. Realized I could buy one of those duvet attachments whereby everything remains connected so all I had to do was lift/pull up the top sheet/duvet — game-changer especially considering I’m currently 7-months pregnant.
The whole process took approximately 2 months to complete as we had to coordinate with Amara’s naptimes and Liam’s work schedule. Overall costs were approximately $1,500 for everything — bed etc., which initially felt like way too much money; however stretched out over several months, was affordable. Transformation? Absolutely incredible. What previously felt cramped and an after-thought transformed into this peaceful sanctuary that truly feels spacious despite the oversized bed.
Best decision was disregarding everyone who claimed it would not work. At times you have to rely on your intuition regarding what your family requires regardless of how improbable it may seem on paper. All three of us slept better, Liam’s back healed and I had enough room to lie down comfortably with my pregnancy pillow without rolling off the bed. Next time around (with baby #2) we will have enough space for a bedside crib.
While our bedroom will never be large (it won’t be featured in any magazine); nevertheless, it functions perfectly for our family. Amara enjoys climbing up onto our bed for bedtime stories, there is storage for all items required and it truly feels like a full-fledged adult bedroom instead of college dorm style housing. Occasionally, the most absurd ideas turn out to be the most genius ideas